Writing Piccolo Command Center Plugins – Setting up the environment
- July 6th, 2010
- Write comment
Writing plugins for the Piccolo Command Center opens up many possibilities for integrated tools. Often these tools may need to work with other tools like the PCC’s main map. By taking advantage of the work done by Cloud Cap Tech you can skip to developing the tool you need instead of spending time writing your own map tool from scratch. For those interested in writing plugins the first step is to set-up the environment to write and build the plug-ins.

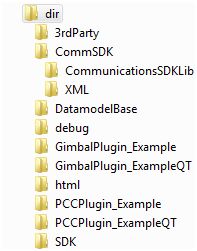
Each distribution of the Piccolo software comes with a copy of the commSDK and the CloudCapPluginSDK. These two zip files can be found under <Start><Cloud Cap Piccolo 2.x.x><Tools><Software Development>. Unzip the CloudCapPluginSDK.zip into your working directory. Unzip the contents of the commSDK and put them in a folder called “CommSDK”. Put this folder in working directory. The final directory structure should look similar to that shown to the right.
The PccPluginExamples is a Visual Studio 2005 file which will contain some examples to get you started. Now you will want to install Visual Studio 2005 if you have not already done so. It may be possible to compile plugins in a later version of Visual Studio, but I am not aware of any success stories for that path. Once you have installed VS 2005 you should be able to open the PccPluginExamples file. From the “Solution Explorer” click on “PCCPlugin_Example”. Then on the main menu selected <Build><Build PCCPlugin_Example>. The Plug-in should compile successfully.
If the compiler complains of missing files, or you need to put the commSDK elsewhere you will need to review what paths the compiler is looking under. These can be found by right-clicking on the line “PCCPlugin_Example” under the “Solution Explorer” and selecting properties. The include directories can be be found under <Configuration Properties><C/C++><General>. A similiar list for the linker can be found under <Configuration Properties><Linker>. The libraries to be included by the linker are listed in under <Configuration Properties><Linker><Input>. You will probably not need this information if you are using version 2.1.1.c or later. If you are using an earlier version you may also need some of the information discussed in this thread on the cloud cap forum.
Setting up Qt with Visual Studio integration for use with VC 2005 can be a challenging task because you will need to build the add-in yourself. Luckily this guide steps you through the process and makes it easy. This method has been shown to work on Windows XP. Once you have finished building and installing QT you should be able to compile the Qt example also included in PccPluginExamples.
Alternatively, Cloud Cap has gone through the process of building qt for VC 2005 and has made the result available. Go to http://www.cloudcaptech.com/download/Custom%20Plugin%20Tools/ and download the zip file. Included is a read-me file with directions on how to install the software. You will first need to install QT. The link provided in the didn’t work for me, but I found the file at http://ftp3.ie.freebsd.org/pub/trolltech/pub/qt/source/qt-win-opensource-4.5.2-mingw.exe . Then run the executable included in the zip file. Finally go to http://qt.nokia.com/downloads/visual-studio-add-in and install the Visual Studio Add-in. Finally, you will want to edit your environment variables. Make sure that you close any open instances of visual studio before starting this process.