Writing Piccolo Command Center Plugins – Setting up the environment

Writing plugins for the Piccolo Command Center opens up many possibilities for integrated tools.  Often these tools may need to work with other tools like the PCC’s main map.  By taking advantage of the work done by Cloud Cap Tech you can skip to developing the tool you need instead of spending time writing your own map tool from scratch.  For those interested in writing plugins the first step is to set-up the environment to write and build the plug-ins.
commsDirectory

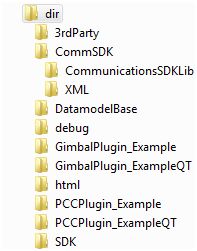
Each distribution of the Piccolo software comes with a copy of the commSDK and the CloudCapPluginSDK.  These two zip files can be found under <Start><Cloud Cap Piccolo 2.x.x><Tools><Software Development>.  Unzip the CloudCapPluginSDK.zip into your working directory.  Unzip the contents of the commSDK and put them in a folder called “CommSDK”.  Put this folder in working directory.  The final directory structure should look similar to that shown to the right.

The PccPluginExamples is a Visual Studio 2005 file which will contain some examples to get you started.  Now you will want to install Visual Studio 2005 if you have not already done so.  It may be possible to compile plugins in a later version of Visual Studio, but I am not aware of any success stories for that path.  Once you have installed VS 2005 you should be able to open the PccPluginExamples file.  From the “Solution Explorer” click on “PCCPlugin_Example”. Then on the main menu selected <Build><Build PCCPlugin_Example>.  The Plug-in should compile successfully.

If the compiler complains of missing files, or you need to put the commSDK elsewhere you will need to review what paths the compiler is looking under.  These can be found by right-clicking on the line “PCCPlugin_Example” under the “Solution Explorer” and selecting properties.  The include directories can be be found under <Configuration Properties><C/C++><General>.  A similiar list for the linker can be found under <Configuration Properties><Linker>.  The libraries to be included by the linker are listed in under <Configuration Properties><Linker><Input>.  You will probably not need this information if you are using version 2.1.1.c or later.  If you are using an earlier version you may also need some of the information discussed in this thread on the cloud cap forum.

Setting up Qt with Visual Studio integration for use with VC 2005 can be a challenging task because you will need to build the add-in yourself.  Luckily this guide steps you through the process and makes it easy.  This method has been shown to work on Windows XP.  Once you have finished building and installing QT you should be able to compile the Qt example also included in PccPluginExamples.

Alternatively, Cloud Cap has gone through the process of building qt for VC 2005 and has made the result available.  Go to http://www.cloudcaptech.com/download/Custom%20Plugin%20Tools/ and download the zip file.  Included is a read-me file with directions on how to install the software.  You will first need to install QT.  The link provided in the didn’t work for me, but I found the file at http://ftp3.ie.freebsd.org/pub/trolltech/pub/qt/source/qt-win-opensource-4.5.2-mingw.exe .  Then run the executable included in the zip file.  Finally go to http://qt.nokia.com/downloads/visual-studio-add-in and install the Visual Studio Add-in.  Finally, you will want to edit your environment variables.  Make sure that you close any open instances of visual studio before starting this process.

  • Edit environment variable to add:  QTDIR = c:qt4.5.2
  • Edit the PATH environment variable to add:  %QTDIR%bin.  This variable will likely contain other values so remember that to separate your value with a “;”.
  • New Plug-in for Roll Pitch Gimbal

    Besides the Piccolo autopilot Cloud Cap makes another product called the TASE.  This system is built around a pan-tilt (PT) camera that can be mounted on an UAV.  The system can be closely integrated with the Piccolo Command Center allowing the user to quickly redirect the camera.  This system costs as much as a new Piccolo autopilot and as such was disregarded by the Aerial Robotics Club for whom I am writing this plug-in for.

    However, the software to integrate with the gimbal is available at no additional cost to control a PT gimbal.  Thus the plan became to write a plug-in that would make adapt the commands for a PT gimbal to a roll-pitch (RP) gimbal.  This plan of action was pursued for about two months and the software was unavailable at three test flight days.

    Finally,  I came to my senses and realized that I could make a much more simple plug-in that would satisfy all the requirements of the user.  The only feature gained by going through the TASE software was the ability to right-click on the main map and redirect the gimbal to lock to a GPS location.  Having removed this feature I was able to write a preliminary version in a mere two hours.

    RP-Gimbal

    As shown above, the preliminary version successfully implements the two features shown with white buttons.  The stow button commands the gimbal to a position that puts the lens as far from the ground as possible; helpful during rough landings.  The Nadir button points the camera straight down for taking orthographic pictures of the ground.  A text field shown on the bottom half is used only for debugging purposes and will not be included in the final product.

    The Angle, Offset, and Orbit features were not implemented, but will require only a modest time commitment to make work.   The arrow will gives the user a graphical feed-back of the current roll of the gimbal relative to the earth.  The “Auto-stow” feature is also another to-do list item.  This feature will automatically unstow the gimbal when the aircraft is in a “flying” state and keep it stowed for all other portions of the flight (preflight, take-off, and landing).

    This feature is more then adequate for all the competition and testing purposes.  The Nadir feature is allows for imaging the search area.  The Angle and Offset features allow for photographing an off-center target.  The Orbit feature allows simple targeting of the “Pop-up” target.  It can be noted that these features still exceed the requirements, as the last three features all do essentially the same thing (off-axis pointing).  However, all will be included because their inclusion is not time-consuming and will reduce the operator’s workload greatly.

    In this discussion I have neglected to comment on the Adapter and GPS buttons.  Although the project has gone in a new direction it would be interesting to see advanced features included.  In time these will likely be removed as vestigial code.

    Upcoming Project: Variometer

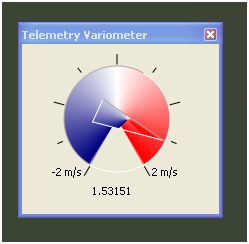
    I’ve started working on my next project, a telemetry based variometer.  A variometer is commonly used by glider pilots to monitor the rate of climb of the aircraft.  The Piccolo autopilot provides the operator with altitude information, but does not exploit this to data to the full extent.  The plug-in that I am working on will include compensation for total energy and for the intrinsic sink rate of the aircraft (if sufficient information is provided by the operator).  This will make it easier for an operator to determine if the plane is in rising air during thermaling maneuvers.  It will also eliminate the need for a separate variometer system to be installed in the aircraft.

    VarioProto

    Above is the latest screen-cap from the variometer prototype.  The device is nominally functional, but it far from finished.  The to-do list includes user configuration options, audio indications, and ascetics.  Adding the audio feedback will be a rather interesting feature, although it may be dropped from the initial release of this plug-in.

    WattMeter V1.0

    I am glad to announce that the first version of my WattMeter plugin for the Piccolo Command Center is now ready for release!  It is my intention to make this software available as freeware.  However, ITAR restrictions prevent me from simply posting it online for anyone to download.  I hope to find a solution to this problem in the near future.

    The WattMeter plugin is a tool for advanced battery management.  Using the analog inputs on the Piccolo autopilot it is possible to feed live current and voltage readings from an external device in to the PCC.  However, to be useful the readings must be calibrated to actual units (volts and amps).  In order to do this live on the flight line, this plugin was created.

    Display:WattMeter1_Display

    With the voltage and amperage data collected it is possible to further manipulate the data to determine wattage and watt-hours drawn.  If the watt-hours capacity of the power source is known then the reserve capacity can be determined as well as an estimate of how long it will last.  This data is derived using the variables defined in the configuration panel which have automatically been loaded.

    It is also important to note that the integration of the watt-hours starts as soon as the plug-in is loaded.

    Configuration:
    The “Configure” button on the display panel launches the configuration panel which gives the user complete access to the calibration variables.  This version of the WattMeter allows the user to select which of the four analog inputs to use as the data sources.  The relationship between the voltage/current and the readings is assumed to be linear.  Therefore the slope and intercept variables are all that is needed.   The section marked “Power Source” contains the maximum capacity of the power source as measured in watt-hours.  This variable can be changed at anytime without effecting the integrity of the data.  When the “Save” button is pressed, all settings are saved to disk as well as applied to the on-going calculations.  Note that an adjustment in the sensor calibrations will not be applied retrospectively to the data.

    WattMeter1_Config
    Menu:

    Upon launching the PCC the display panel will not be visible.  To view the display panel simply click the new “WattMeter” menu item under “Window”.

    WattMeter Menu Item

    WattMeter Menu Item

    Return top